Tuesday, July 24, 2012

Christmas in July

Globecraft Memories has created the most delicious Christmas ornaments. Today I want to share a few with you. today. These delightful ornaments made their debut at CHA. There are a variety of designs and I love them all. I have tons of ideas for things I want to do.

This first one is a beautiful angel. Took the center piece and covered it with embossing enamel adhesive. Then I sprinkled it with copper kettle embossing enamel. I flash set it, then added a second coat and did a full heat set.


 For the top layer, I ran the chipboard through my Vagabond in my Divine Swirls embossing folder. I used a versamark pen to trace the swirls and covered them in the copper kettle powder. I heat set that.

 Next I filled in between the swirls with liquid pearls in a dark blue and let it dry. Once dry, I covered it all with a dark blue Stickles. I then added multiple coats of glossy Glastique. It made such a thick glossy coating. It almost looked like real glass. It added such a depth to the ornament.
 The back globe was painted with the liquid pearls and Stickles. I wish I could send this ornament to each of you to see. It turned out gorgeous.


 This second ornament is also an angel. This one is bowing down to the Christ child. This one was elegant and beautiful as well. I painted the back globe with Chocolate Brown Liquid Pearls. I masked off the outer edge of the middle piece. I used the enamel adhesive to coat the angel, Christ child, star, and hanger loop with 24K Gold Embossing enamel.  Once that was heat set. I painted the outer edge with Jenni Bowlin's Malted Milk acrylic paint.
 The top ring was covered in embossing enamel adhesive as well, and then sprinkled with Mermaid Tears embossing enamel. I flash set and then added a second coat before doing a full heat set. They were all glued together using Glastique which makes a great adhesive as well.

I hope you like the ornaments. They were fun to make. I will share another in the next day or two. I love them. You can head over to Globe Craft Memories and save 25% by using coupon code TS25.

Friday, July 6, 2012

July 100 Cartridge Blog Hop


Welcome to Erica's Craft Room
100 Cricut Cartridge Blog Hop Day ONE
You should have started at http://mycricutcraftroom.blogspot.com/ if not please start at the beginning
Welcome to My Cricut Craft Room's one year
"BLOG-iversary" of our first 100 cartridge Blog hop!
A year ago the blog was kicked off with the first design team members
and daily postings. It took 2 months to get ready for this hop last year.
Now we bring it to you the first full weekend of every month.
Collectively the design team uses over 100 different Cricut Cartridges
in their projects during the two days of this hop. Sunday the new members
of the design team will be announced and some have even made a
project to share with you!!
What an exciting weekend!!
As special treat enjoy 10% off of your total purchase with Erica's Craft Room Store.
Use the code JULY to see 10% off of your total purchase (No exclusions)
on July 7 & 8. Also on Sunday there will be an exciting announcement!!!
 
This month I picked the following cartridges:
 
Pagoda
Sports Mania
Paper Dolls Dress Up


I can't believe it is time for the 100 Cartridge Blog Hop again. It has been a quick month. I wanted this month to be different for my projects.I wanted to use my carts in ways that would make you go, "Wow I can't believe that is that cart." I hope I have achieved this goal.


Here is my project showcasing the Pagoda cartridge. I wanted to make some big flowers that could act as center pieces. I used the shadow for the flower on page ?. It has an even number of petals. I used 12x12 sheets of cream cardstock. I cut the flower at fit to page. I did this six times, because I only had six sheets the same color. I think it would look incredible with more layers.
I cut slits between every other bump on the flower. Each section had two bumps. I then used a skewer to curve the petals back and shape them. I then stacked the layers and glued them together.
I added a votive holder and a candle to make a lovely centerpiece. They would be great for a bridal shower or a nice tea.
This is a picture on a 12x12 sheet of paper to show you the real size of it. On the top layer I added some Iced Stickles in Coffee and then added Stardust Stickles to all the layers.

Some side shots of the details of the petals.

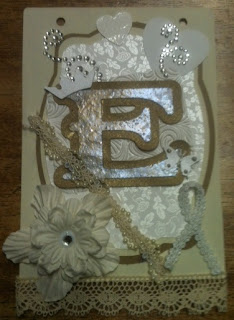
My second project uses both the Sports Mania Cartridge and Paper Doll Dress Up. I was part of a banner swap. I had to make the E in a banner that will spell create and only used white, cream, and kraft to design with.

 When you look at this I hope you would say Sports Mania and PDDU? That is where getting to know your cartridges comes in handy. The hearts are from sports mania and the crown is from Paper Dolls Dress Up. This is a cartridge with lots of fun cuts and at only $29, you can't go wrong, There are many little goodies here.

The liquid pearls on the butterflies is called Platinum. I use these on lots of things. Erica is having a great sale, so go check things out, but first head on over to see what my design team sister Doris has for you to see.
Click Here


If you get lost along the way here is the entire line up

Thursday, July 5, 2012

Theme Thursday Snow Day

It is Theme Day Thursday at My Cricut Craft Room and the theme I am working with is Snow Day. We don't get much snow down here in Louisiana and or growing up in San Antonio, so I decided to go with a card. Most of you know I don't make cards like a normal person. I start out with an emotion or feeling and try to express it through my card front. I started looking through my Cricut cartridges and I really liked this building a snow woman silhouette. I started thinking about snow days and thinking about childhood and making mistakes. Especially when you aren't used to the snow.So here is what I came up with for your viewing pleasure.

I cut the silhouette at 3 1/4 inches from smooth black card stock. The card front is a a piece of pearlized white card stock. The background was created using my favorite products Tim Holtz Distress Inks. I started with the Stormy Sky distress ink pad. I wanted light coverage, so the pearl would still shine through, so I used a felt pad instead of a foam pad. Once I had the blue background it was a little too blue, so I added just a bit of Weathered Wood distress ink to give it that touch of steely grey in a winter sky. The swirls were stamped off the edge using the large swirl stamp in the Tim Holtz large stamps set Urban Chic. I know for me personally 29.99 sounds outrageous for a set of stamps, but that is the retail. I had to wait for a sale, but they are so worth it. I use this set all the time. If you can't afford them now, make a point to get them the next time Erica has a sale. There isn't a picture on Erica's site, but here is a pic of the stamps on this set.

I used the Stormy Sky ink to stamps the swirls and then outlined then in Waterfall Stickles. I was trying to create the feeling of the swirling snow. In between I added some stickles snowflakes in stardust stickles and they were also used to make the snow at the bottom of the page.

The skirt and scarf were colored in with liquid pearls. I was thinking of a child not used to snow bringing out their mother's silk or satin and ruining it. That is the type of thing I would have done. The skirt, mouth, and dots on the scarf are Liquid Pearls Flamingo. The scarf is Liquid Pearls Ocean Blue.


 Lots of fun great products here. Now if that wasn't enough, I have one more trick up my sleeve. I have a sneak peek for you. One of our new design team members was eager to get started and created a card for today. Since the big reveal of the new design team members isn't until Sunday, she can't post her card today. I thought you might enjoy a peek though of what lies in store.

Now head on over to My Cricut Craft Room and see what my design team sisters have in store for you.