Leslierahye is hostessing another one of her amazing blog hops. I tried to resist, but I couldn't; I had to get in on this Steampunky goodness. I decided to join the hop and designed a card I love. If that wasn't enough Erica over at Erica's Craft Room Store offered to sponsor my stop on the hop and I am giving away a $10 gift certificate to her store.

When I was trying to decide what I wanted to create or achieve for this hop and started thinking about what Steampunk means to me. The images go along with a period in literature that explores the possibilities. Where peopled dreamed of what could be and how science and technology(somewhat primitive back then) could take us there. Then I needed to combine that with Red-White-Blue Summer which to me says Americana. I thought of the Statue of Liberty, because what says dreams and possibilities more than Ellis Island and the Statue of Liberty. Also when I was younger I had this weird notion that she was a mechanical lady and had walked across the bottom of the ocean to get here. Where she stands was where she came out of the water and broke down. I know I was weird kid with a wild imagination. So even if the rest of the world doesn't think of the statue of liberty as steampunk, she is still steampunk to me.
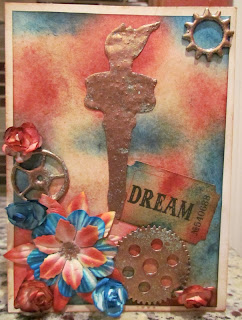
An ever so slightly different angle to make sure you can see the texture and dimension of the torch. I started off with one of the white basic economy card bases from M's. I cut two pieces of white cardstock. One to fit the card front perfectly and one a quarter of an inch smaller, so i would have an eighth of an inch border. Most of the products I used can be found in
Erica's Craft Room Store. If you click on the product the first time I list it, it will take you directly to that product. I inked the edges of the card base and my larger piece of white cardstock with
Tim Holtz Vintage Photo Distress Ink. I took the smaller piece of cardstock and inked it with
Tim Holtz Fired Brick Distress Ink and what should have been
Tim Holtz Faded Blue Jeans Distress Ink, but I can't find it so I used a different ink and it did not want to react as well as the distress inks. Once I had the red and blue splotches, I went back over the whole thing with the vintage photo. The
flowers all started out as white. I pressed the flowers into the distress ink pads and then spritzed them with a mini mister, so the color would spread through the petals. I am not sure which ones are which, because I dump them all together in a container, but
there are several different shapes to choose from and then you can layer them too.
The dream tag was inked in the same way and is one of the
Tim Holtz Adage tags.I love these, because they add that little something my projects need. There are so many in a pack and different words that I get to spread them out over a lot of different projects. You get almost 100 of them for around four bucks. I love getting a lot of bang for my buck.
This picture is here to show what you can't see. I am the world's messiest gluer and you can not see it. Unfortunately, this glue and the embossing enamels are not something you can get from Erica, but if you decide to get some, use the code TS25 and
Globecraft Memories will give you 25% off your entire order. This glue is
Glastique matte. I didn't really believe it would be string enough to hold heavy metal embellishments, so I used a lot and it squished out, but it dried absolutely clear. You can not see it at all and it held the heavy metal. I also want you to see the metal piece. It is out of a multi pack of gears and sprockets from M's, but I changed the color by covering it with
embossing powder adhesive and then coating it with
Globecraft Memories Vintage Copper embossing enamel. I love how it has that patina effect and the green is showing through. It is even more amazing in person.
This little metal embellishment is a
Tim Holtz sprocket, but I covered it with the vintage copper also. It was copper to begin with, but not the patina copper I wanted.
The torch is a cricut cut. It is cut at 3 1/2 inches from
the Stand and Salute cartridge. If you have a cricut and don't have this cartridge you will want to look at it. There is so much I use this cart for and not just military or patriotic pages. I have cut out pink ribbons for breast cancer awareness, planes for little boy pages, stars for all kinds of things, anchors for a cruise page. It really is a versatile cartridge and Ericas has it for only $34.99.
The torch is cut out of basic smooth cheap black cardstock, but covered with the vintage copper. Now when working with the embossing enamels, you can use the flash set or full heat set meaning you heat it linger with your heat tool. I completely heat set it and then after it cools, I come back and hit those areas again to really get the green patina to bubble up and show through. That is another one of the Tim Holtz gears up in the corner. Below is another closeup of the patina and aged metal effect.
Once again I would like to thank Erica's Craft Room for sponsoring my stop on this blog hop. In order to be eligible to win the gift certificate, leave me a little comment love and maybe tell me how you would spend your gift certificate. It is not required for you to follow me, but I would love it if you decided to follow.
Happy Crafting!
KathyJo


 When that didn't seem to come together, I decide I was going to make a steampunk inspired card. I found the perfect stamps on ebay and ordered them. Silly me, I forgot I am not much of a card maker and the stamps didn't show up on time. I should have ordered from Viva Las Vegas stamps. They have positively yummy steampunk stamps and they would have gotten here on time. So, there is no card to show a picture of at this time. For those of you who don't know two weeks ago today Gypsy (my daughter's rat terrier) had a run in with the lab and her eye popped out. She had to have surgery on her eye and she became our steampunk puppy. With the victorian collar and the tubing stitched around her eye she looks like something steampunk. I decided to share our poor steampunk puppy's story. I thought a scrapbook page with "We Love Our Steampunk Puppy" as the title would be perfect. I started creating and had this vision of a big steampunk heart. What do you think? It is so now steampunk wonderful. It looks way to cutesy. At least the dog isn't way too cutesy. Maybe she looks a little more steampunk...


