Thursday, May 31, 2012

1st Attempt at a Bubble Frame

Globecraft Memories offers these amazing cardstock mini bubble frames. They are different than their book quality chipboard frames. These are made from a nice quality cardstock. They come in a three pack and are designed to hold a wallet size photo. I was simply playing and getting to know the product and this is what I came up with. Of course I started out with the crafting staple I am most comfortable with and grabbed a couple of my distress inks and got started inking.These cardstock frames are not available quite yet, but you can find their other frames here.
 Once I had it covered in ink, I wanted something to make the edges pop. I ran the edges across the top of the enamel adhesive dauber and then sprinkled Copper Kettle embossing enamel and hit it with some heat. Because the Copper Kettle is a micro fine powder, I got a really thin pretty copper edges. It would make a beautiful accent on a card.
 I used some of the Piccolo pieces to make an accent at the bottom. These are actually out of a set that is not available yet, but there are similar swirls and flourishes in the card decor sets here.
The little birds are also Piccolo pieces. I covered them with blue acrylic paint and let it dry. They needed a little sparkle, so I ran a versamark marker along the edges of the wings and then dipped it in the copper enamel powder. I then heat set it. The little heart I also covered in enamel powder. It was so tiny it wanted to blow away and the tweezers were getting in my way, so I took a repositionable glue dot and stuck it to my silicone mat. Once I heat set it I just peeled it up and glued it down. I glued all of the small pieces with Glastique. It was fun playing with the product.If you are ready to start playing with these wonderful items head on over and use the coupon code TS25. This will give you 25% off your order.

Tuesday, May 29, 2012

Card Tuesday


Well it is Card Tuesday at My Cricut Craft Room. Today we had the choice of following the sketch or making a card featuring a certain flower. I chose the flower thinking finding a carnation would be easy. Well, the only carnation I found was on 50 States and someone else from school has the cart right now. So, since I didn't have access to that cartridge and the red carnation cut, I decided to make my own. I went online and looked at several pictures of carnations. I pulled out Mother's Day Bouquet and chose a bloom with jaggedy edges. I used the next to the last key on the first row.


I cut them at 1", 1 1/2" and 2". I knew I was using copper on the card and didn't have any small copper brads. I held a small gold brad with tweezers, got the head good an hot with the heat tool, dipped it in vintage copper embossing enamel, and then heat set until smooth. I then poked the brad through the center of the layered cuts. Once they were secure, I spritzed them with a mini mister filled with water. Once the water soaked in and the fibers of the paper were loosened, I scrunched them up by hand and shaped into a flower. Needless to say it didn't come out looking like the carnation I was aiming for, but I liked the result anyway.


I used a premade card base and inked the edges with Spiced Marmalade Distress ink. I honestly believe the most versatile products I own are my Tim Holtz distress inks. If you are looking for a good value for your money, invest in some of these inks. A little goes a long way and you will find so may uses for them.


The papers I used for the flower and the torn piece are from the Bo Bunny 6x6 Country Garden Pad . They are beautiful. If you have never played with Bo Bunny before, they are an excellent quality paper. They cut well on the cricut, they tear beautifully by hand, and they ink exquisitely. Erica has the whole line. The trinkets are really nice and add a gorgeous accent. I didn't add one to this card because I was going for a more simple look and the trinkets are very elegant looking.


The thanks was cut from Don Juan at 3/4''. It was cut out of basic brown cardstock. I then covered it in embossing enamel adhesive and quickly covered the wet adhesive with Vintage Copper embossing enamel. Talk about a different effect. It looks like aged patina mixed with the copper. The green and white mottled look you get on old copper is there. I tried to get a good shot of this. It really is raised and metallic like metal, but I have never seen paper with this old metal look.


I hope you enjoyed my card. Now head over to My Cricut Craft Room to see what my design team sisters have created.
Happy Crafting!
KathyJo

Saturday, May 26, 2012

A Bookmark with a Melted Metal Look

Okay those of you who know me know I am weird, but today you are going to read just how weird. Today's project, a little bookmark, is in direct response to a 30 year old curiosity. I remember in elementary school they showed us films in the cafeteria. They were on the big reels, and we were so excited when we got to watch them. There are two that still fascinate me. One was a film on volcanos and the other was Johnny Tremain. The volcano film showed the lava flowing down a hill, and I was enthralled my the liquid rock. I wanted to touch it. Yes, I realize it would burn my hand off, but I really wanted to feel it. When we watched Johnny Tremain their melted silver just fascinated me. I wanted to play with it. I wanted to pour it and drip it and splatter it. Not something I was able to do until now. The amazing enamel powders from Globecraft Memories gave me the chance to make it look like I had been playing with molten silver without burning my hands off. I was simply playing and getting to know the products when I made this bookmark.
 This was a fun little project that I love for many reasons. I am a reading teacher, so I almost always have a current book I am reading. Second, it was simple. Third, it allowed me to use a cricut cartridge I haven't used much. Fourth, it allowed me to use a little tiny photo that has been sitting there for years. Fifth, it was a great learning experience with Glastique and the enamel powders.
 I love how it looks like I dripped metal on the surface. It is raised. My sister was visiting and saw this in person and thought the metal look was very cool.
 Another angle to try and show you the dimension of this product.
 To make this, I cut two pieces of patterned cardstock in the same charm shape from Fabulous Finds and cut one with the blackout feature, so we wouldn't have a hole on the reverse side of the star. I coated each piece with glossy Glastique. I used a small paint brush and spread a thin layer on each one. I repeated this twice.You can see the the paper stays flexible even after the coating. It almost felt like plastic at this point. It really strengthened the paper too. I tried tearing it, and it is really hard to tear once coated in Glastique.Make sure you rinse your paint brush right away if you spread it with a paint brush. If you rinse right away it rinses right out. If you forget to rinse it for a while, it is not an easy task to clean that brush. I then used the glastique as an adhesive to glue down the picture and then glued all the layers together.
 Once it was dry, I took a versamark pen and ran it around the edges and added the Vintage Silver Enamel Powder which I heat set. It wasn't as smooth as I wanted, so I ran the versamark pen around the edge again and added more enamel powder. 
I drew dots on the front with the versamark maker and added the enamel powder to that as well. I love how after being heat set it is still raised and looks like I just dripped it there. Okay, so maybe I am not Johnny Tremain, but I sure had fun making this cute bookmark. I added ribbon to hold my place and it was done.

If you are like me, you are going to want to play with and try out these new products. Globecraft Memories has generously offered a coupon code to all of the Hobby Baby team to share with our blog readers. You can use Coupon Code TS25 for 25% off your total purchase.  Head on over there and get some of these enamel powders. I promise you will love them.
Happy Crafting!
KathyJo

Friday, May 25, 2012

Scrapbook Friday

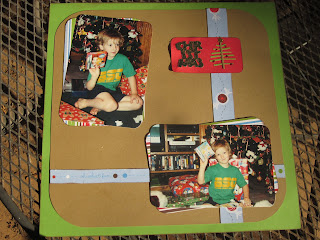
It is Scrapbook Friday over at My Cricut Craft Room and we are making scrapbook pages. I signed up to do the sketch thinking there were two sketches each month, but there was only one this month. I have already posted one layout with this sketch. The great thing though is that this sketch is so versatile and easy to use that it was fun to make another page with this sketch. This is really a fun easy sketch to use. This layout literally took me ten minutes to make. This is also the 25th which mean......

I chose to make a quick easy Christmas page. Now I used this sketch at its most basic level. It was meant to be a simple page. Scrapbooks need balance. I have some pages that take hours to create and others that need to be finished in ten to fifteen minutes.Here is the sketch....
I pulled some old Christmas pictures since I am several years behind in my scrapbooking. My Nicky was just so cute in these pictures.
This is just a fun simple layout. You can tell we live in the south. Nick is wearing shorts and a t-shirt on Christmas morning. One of the things that made making this layout so easy was laying out the elements in Cricut Craft Room. If you have been afraid to use this, get over your fears and start playing. I just used a square in the free digital basic shapes in CCR. I made it large enough to be my big square. It already had the rounded corners. The rectangle mats are from Fabulous Finds. I just eyeballed it. I knew they needed to be about 4x6.
 The Christmas and the tree were pulled from Designers Calendar. Again, this was done in CCR, so I just sized it to what looked pleasing to the eye. The Christmas was cut out of kraft cardstock and covered with Holly Stickles which is a mix of red and green. The star is covered in Gold Stickles and the ornaments are Christmas Red Stickles .

All of the edges are inked with Jumbo Java Chalk Ink . It gives depth and definition to the edges. These inks are so smooth going on and they last an incredibly long time. The one I used on this layout is at least two years old.

I hope you enjoyed my fun layout. If you are in need of the materials used click the links and they will take you straight to Erica's store. Now head on over to My Cricut Craft Room and see what my design team sisters have created for you to see.
Happy Crafting!
KathyJo

Thursday, May 24, 2012

Love These Bubble Frames...

Today is my first as a Hobby Baby design team member. This was probably the hardest post I have ever done. The products from Globecraft Memories are so much fun to work with, I just couldn't decide what to make for my post. I did a lot of playing, and you will see some of the other projects in the next few days. Today I am going to share one little goody with you. I apologize in advance for my photos. I haven't been able to replace my good camera. It is hard to get pictures without reflections with my daughter's camera. Anyway, on to the good stuff...
 This is one of the Globecraft Memories Bubble frames. This size is sized for wallet sized photos. I used a 4x6 photo that I cut down. This bubble frame is a cardstock frame, so I took the both layers inked them with Tim Holtz Brushed Corduroy Distress Ink Then I ran it through the Vagabond in a Sizzix embossing folder. I took another blending tool and brushed Vintage Photo Distress Ink across the raised surfaces.
 Look at these great sprockets and gears in the corner. These are some of the new Micro Picolo pieces that will be available soon.The Piccolo enamel adhesive makes embossing these a snap. The enamel adhesive comes in a bottle with a dauber top. You just press it to the chipboard, sprinkle the enamel powder, and then heat set. I used Copper Kettle and Vintage Silver. I love that although they are both metallic, they are very different looking. The silver is a much thicker enamel, but the copper is much finer. I used Glastique as an adhesive to hold the gears and sprockets.
 Here is the bottom of the really fun part...if you are a motocross racers, dirt is everything. If you are a little boy racing motocross, you dream of going to Loretta Lynn's ranch. Not because they want to hear her sing, but because there is a huge race there each year. My son qualified for Loretta's, but we decided not to go. We did stop and let him walk the track and check out the grounds on one of our trips through Tennessee. He was so excited, that he filled a plastic bag with dirt and brought it home. He even gave some of the dirt to friends that also loved motocross. As I was playing with this frame, I thought about that dirt. I took some of the Glastique and glued some of Loretta Lynn's dirt in the globe. The glastique dries clear, so it looks like the dirt is just sitting there. It looks like the roost that gets thrown when they are taking off.
 You can see the embossing here and the sprocket. In person it almost looks like carved wood.
Take a good look at these pieces here. See how much thicker the silver is than the copper? You have got top try these enamel powders. They are amazing. Also, did you notice the clean edges on the chipboard pieces? This is a compressed chipboard that is laser cut, so they are gorgeous.You can look though the currently available Piccolo pieces here.

I know once you look at these you are going to want to play with them yourself. Globecraft Memories has been generous enough to provide us with a coupon for 25% off your total order. The coupon code is TS25.

Happy Crafting!
KathyJo

Thursday, May 10, 2012

Scrapbook Friday at My Cricut Craft Room

It is Friday and that means Scrapbook Friday with My Cricut Craft Room. It is also the Friday we introduce a new sketch challenge. All that is asked is that you use the sketch being featured to create a scrapbook layout. I love the sketch this time, because it is perfect for quick easy pages, but could be frillied up if you wanted.  Here is the sketch...

I decided to pair this sketch with some great Kaisercraft papers I got from Erica's Store  and if you use Code 33 there is 33% off anything not already marked down. She also have $5 shipping through today. I love these Kaisercraft papers. One of the many things I love about them is that they cut beautifully on the Cricut. I also LOVE the little bonus strips. You know how you have to cut that little strip off of 12x12 single sheets to get rid of the barcode? Well they have printed a border on the back of those strips. They coordinate with the papers and don't end up in the trash. 


I used Lyrical Letters the Jumbo feature to cut letters for my layout. The strips are from the bottom of the papers and the little mat is from one of the sheets in the collection. Here is the layout. I have more pictures to add, but blogger is not behaving right now. After you check out the layout head over to see what my Design team sister have created. KathyJo

Add caption

Wednesday, May 9, 2012

Chattering Robin's Challenge

Each month there is a page map challenge over at the Chattering Robin's Blog. Here is last month's challenge. I finished this the other night and between computer issues, being sick, and baseball season I didn't get it posted until today. They have already announced a winner, but I still wanted to share what I created.  Here is the map
I decided to make a canvas to hang on the wall. I used papers by Glitz designs, some Darice flowers, Zva pearl flourish, and Robin's Nest dew drops.


Well, I guess it is better late than never. Maybe I will find some other challenge to enter.
I am entering the JellyPark Challenge here since this is girly girl.


Saturday, May 5, 2012

May 100 Cartridge Blog Hop Day 2

Welcome to My Cricut Craft Room's
100 Cricut Cartridge Blog Hop


My Cricut Craft Room 100 Cartridge Hop            It's the first weekend in May!! Time for the 100 Cricut Cartridge Blog Hop at My Cricut Craft Room!!    I have been using this time to create Graduation cards, and banners!

Please start at http://mycricutcraftroom.blogspot.com Erica has a great giveaway with this hop.  If you comment on every blog post from Saturday and Today you will be entered to win the new Cricut Cartridge  Wild Card 2.  There are also a lot of great challenges going on too!  Don't forget the 31 days of $31 give aways!! Check out the great sales going on now too!! 

You should have come from:  Tiffany http://angel4ever-thecraftyteacher.blogspot.com/


I used three cartridges for this hop. I played with Twinkle Toes, 50 States, and Lyrical Letters. Monday April 30th was Louisiana's 200th birthday and we had all sorts of things going on at school to celebrate. I made this banner to hang outside my classroom.
Here is the banner....
 The large state cutouts have poems written by the students on them.
 The actual banner pieces are a base from Twinkle Toes. I use the bases from Twinkle Toes often for banners. They are great shapes to work with. The white is cut at 4" and the color is cut at 4 1/2".
 The Louisiana on the last banner piece is from 50 States and is cut at 5".
 I punched holes at each edge and put an eyelet in to reinforce the paper. They are tied together with curling ribbon . Doing it this way will allow me to remove the 200th and the Louisiana, so the banner can be used again.
 I used several different colors of stickles and randomly added sparkly goodness. You can find stickles here and use code 33 for 33% off of everything that is not already marked down
The letters are from Lyrical Letters and are the Jumbo creative feature. They are cut at 4".
The kids loved the banner and enjoyed learning how to use the Cricut. They cut the states for their poems fit to page on a 12x12 mat.

I also used Lyrical Letter Jumbo Letters on this layout.
 I love these Imaginecse papers I got from Erica's store.
 The hidden journaling tells the story of these shoes.

Now it is time to head on over and see what Sheila has in store for you. She always has fun projects, so enjoy go here
Here is a list of the line up in case you get lost:


Host- http://mycricutcraftroom.blogspot.com/
Shelley - http://shelley-scrapbookingforfun.blogspot.com/
Claire - http://www.threewaterscreations.com/
Candice - http://stampinpearls.blogspot.com/
Ashley - http://especiallymade.blogspot.com/
Amber - http://pixiperfectcreations.blogspot.com/
Tiffany - http://angel4ever-thecraftyteacher.blogspot.com/
Kathy Jo - http://skrappindiva.blogspot.com/  YOU ARE HERE
Sheila - http://2pawprints.blogspot.com/ GO HERE NEXT
Erica- http://ericasprojects.blogspot.com/
Lisa Carrier- http://ourcraftingcorner.blogspot.com/
Yvette http://gammascreativecorner.blogspot.com/
Christina - http://cema1cema.blogspot.com/   
Raquel - http://kraftykaboose.blogspot.com/  
Heather M - http://digipage-blog.everything-digital-scrapbooking.com/
Sharon - http://simplysweetbysharon.blogspot.com/
Deirdre - http://glitteredroses.blogspot.com/
Lisa Chamberlain - http://lisacustomscrapbooking.blogspot.com/
Ava - http://scrapbookdesign4u.blogspot.com/
Blog Candy http://ericasblogcandy.blogspot.com

Hope you enjoy the hop and happy crafting.
KathyJo

Friday, May 4, 2012

Scrapbook Friday at My Cricut Craft Room

It is Friday and that means Scrapbook Friday at My Cricut Craft Room. This Friday's theme is coffee. I made a layout with no pictures, because I wanted my children to understand "My Sweet Addiction". They have grown up watching me drink coffee, so I am sure they think of me as a coffee drinker, but it hasn't always been that way. After all, isn't that what many of us scrapbook for? To share our memories, our lives, with future generations?

Sorry about the crummy picture, but since my camera is broken I was stuck with an iPhone pic. I used Lyrical Letter Jumbo cut at 2" for the title. The coffee cup is from Don Juan cut at 3". The papers are by Fancy pants designs. Now head on over to My Cricut Craft Room to see what my design team sisters have come up with.
Happy Crafting!
KathyJo