The Robin's Nest is looking for a new design team, and I decided it was time to throw my hat in the ring. The Robin's Nest is an incredible company. Their current design team is amazing. If you have not been to their blog recently, quit reading right now and head over to their blog by clicking here. I promise you will be amazed and will come away inspired. Anyway, I love the products The Robin's Nest has to offer and I think they will be good companion products to complement the design teams I am already on now. The would make my projects for each company even better.
As I thought about what I wanted to do for this project, I decided I was going to do a home decor project. I wanted a nice huge 4th of July wreath for my door. I came up with an idea, but realized that there was no way my hands would hold up to the bending, folding, pinching, and holding of all those little pieces. My fingers were going numb and I knew that this idea would have to wait until a week when the hands were in good shape. I had some photos developed and was absolutely Wowed by the fact that my child is no longer a little girl. She is now a young woman. So the layout Wow came to be...
My first instinct with this layout was to layer tons of paper and make it very elaborate, but the whole point of the layout was to capture her. Not the Wow of piles of product, but the Wow of my child becoming a woman. Anyway, I decided to do what I do best and find balance. I needed balance between the photo and the products and using techniques to highlight rather than overwhelm the photo. I think this was a pretty good mix of all those things.
The title was cut from the darker side of a sheet of BoBunny Abbey Road Truffle. The letters were cut using the Lyrical Letters cartridge using the Loop Le Loo creative key at 3". The problem was the title was fading into the background. I wanted it to pop, so I broke out the enamel powders. I thought I was going to use vintage silver, but it still wasn't wowing me. I decided to go for the gold and covered the letters with enamel adhesive and then coated in 24K Gold embossing enamel. The shine and wow factor is amazing. I immediately knew I wanted some black mini dew drops on the letters, but I didn't have any. I subbed some small Prima Black pearls, but wouldn't these Classified Mini Dew Drops have been amazing? I outlined the letters with glossy accents to give it one more layer of shimmer. It didn't photograph as well as I would have liked, but it almost looks like they are floating.
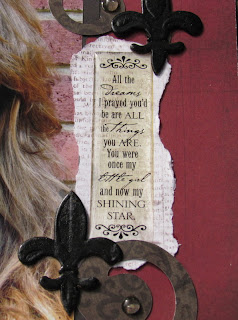
I wanted to add the date the layout. I pulled out this chipboard tile and the fleur-di-lis pieces and covered them in embossing enamel adhesive. I sprinkled them with Ranger Black Super Fine detail embossing powder and heat seat. Using the detail embossing powder allowed the pattern on the chipboard to show. I cut some small numbers and covered them with the 24K Gold powder as well. Although these chipboard pieces were some I had on hand, you could use one of the Robins Nest chipboard pieces to mount the date.
The two flowers were made using the Tim Holtz tattered flowers die. The edges are inked and curled to give them more depth. I am not sure what paper these are made out of as I already had them made and in a drawer, but this paper would work beautifully. The swirls and flourishes were cut using the Cricut and then layered and tucked on the page. I accented the Swirls with dew drops which you can find here. There are so many uses for these little drops of goodness. They make centers for flowers, borders, feet for little boxes, and eye catching treats on a scrapbook page like this one.
The dew drops above and below the quote make you eye stop and read the sentiment I wanted to share with my daughter. I hope one day she will read these words and know that I meant them.
I hope you enjoyed this layout. It has so many different elements, but I hope still keeps the balance. I don't want to the story lost, because that girl in the picture... she is the real story. Good luck to all the applicants for the Robin's Nest Design team, be sure you go follow the Robin's Nest blog, so you will see who makes the team. In the meantime, head over to the store to check out all their wonderful offerings, so you will be ready to craft along when the new design team starts sharing their products. Until next time...
Happy Crafting!
KathyJo
Sunday, June 10, 2012
Subscribe to:
Post Comments (Atom)


1 comments:
wonderful layout, thanks for your submssion to be on the robin nest dt
Post a Comment