Hobby Baby is having a design team call and I decided to audition. Hobby Baby is an online webstore that is expanding their product line. Right now they have a lot of doll making supplies, but they are adding Globecraft Memories products and the most amazing enamel powders. To audition, we were asked to create a project using a home decor technique. Come with me on the journey of this project.
From This to This!
First some of you might wonder why I would even consider auditioning for this team, it is because I have seen their products in action and am itching to get started creating with them. I first saw their enamel powders while watching Terri Sproul's webshow. You can link to her recorded shows
HERE and see what she has been making. I really wanted to make something that would show what I could do with their products. I had just purchased a bag of mixed chipboard pieces that reminded me of the
Piccolo pieces I had seen Terri working with on her show. I whipped out the butterflies and knew I wanted to layer them.I had visions running through my head of an exquisite butterfly emerging from this chipboard "cocoon". I picked three butterflies that were embossed. I wanted layers of color that would give depth to this butterfly. I started by painting them with pearl paint Once it was dry. I rubbed them with Tim Holtz distress stain in Dusty Concord. It was a pretty purple, but I wanted more depth. I decided I wanted to cover them in utee. I coated them again with the distress stain to get them wet and covered them with utee. I grabbed my heat gun, started melting the utee, and was extremely disappointed. The utee reacted with the distress stain and it faded it out. My nice purple faded to a pale lavender.

I kept thinking I wish I had some Terri Sproul Mixers, or the Hobby Baby enamel powders. I just knew they would make it perfect. Unfortunately, I didn't have either one available to me, so I did what any adventurous paper crafter would do and threw another layer on it. I find that if I don't like something, I just keep adding until I do like it or I decide there is no hope. The next layer was actually the nail polish I had on. It was a pinky iridescent purple with glitter in it. I coated the butterfly in that and it actually turned out pretty.
From what I hear about the Piccolo pieces they are not bad about the little nubs where they punch out of the sheet, but cheap chipboard is awful about it. I hate those little nubs, and when they are in small spaces, they are hard to get rid of with out the right tools.
Hobby Baby sells a great set of needle files that reach in all those small spaces. You can find them
HERE.
You just sand off the little bumps. It only takes a few extra seconds, but makes a huge difference in your finished projects.
You can see the bumps are gone.
This is the file I used. It is rounded on one side and flat on the other. Now that I had the butterfly done, what to do with it. I thought about adding it to a kraft wreath I was making, but it wasn't giving me the contrast I wanted and lost its wow factor.
I decided that the butterfly would be used at some point, but this would not be that point. You see that is what MAKES a project. You can't be afraid to set it aside and change directions. As I put the wreath down, my kids finished a box of Lucky Charms cereal. I decided I would play with the cereal box instead. I cut the same shape on my Cricut in three different sizes. I have the deep cut housing, but find that cereal boxes cut well on max pressure and depth with a multi cut.
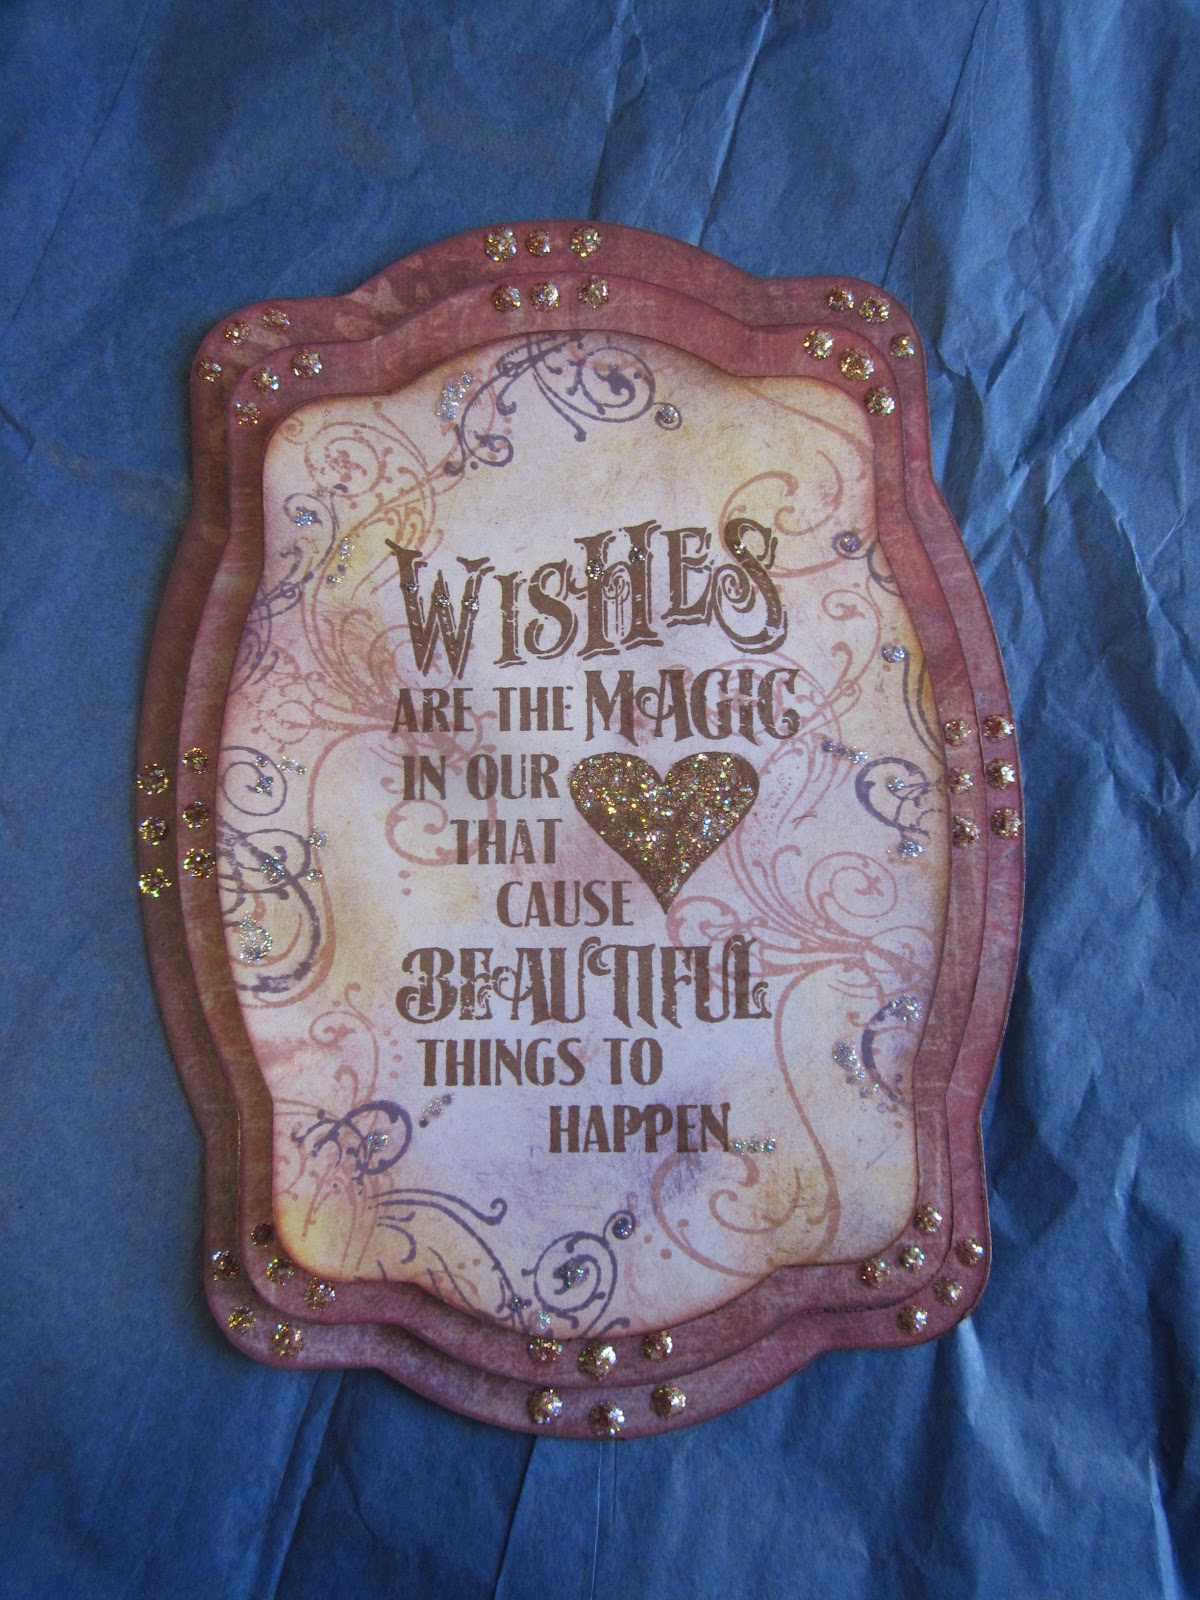
Next I cut papers to match the cereal box shapes. the two larger shapes I cut from a Pink Paislee paper, but the name is escaping me right now. It is something on bought on sale for 10 cents a sheet. The smallest one I cut out of basic white cardstock to use as my artistic canvas.

I pulled out some of my favorite things to craft with Tim Holtz distress inks, Tim Holtz stamps, stickles, chalk ink, and the famous blending tool. I pulled out the Victorian Velvet distress ink and started inking in a cricular motion. I used felt pads as I didn't want either if my background colors to get too dark since I was going to be stamping part of the background with the same colors. When I use the foam pads I tend to get a little heavy with my colors. I then added in some Dusty Concord distress ink. I took a Tim Holtz stamps and stamped the swirls and flourishes using the same distress inks. I stamped the sentiment with Ranger Archival ink in Sepia. Sepia and Coffee are my two favorite archival inks. I hardly ever use black.
I realized the edge of the cardboard was going to show, so I grabbed my Momento Perfect Plumeria chalk ink pad and inked the edges to blend with the papers.
I adhered the papers to the cardboard using modge podge. Then I stacked the three layers and adhered using foam squares to pop them out.
I added Coffee Ice stickles to the heart, but it still needed more, so I added Tiara Glitz stickles to the dots in the words Wishes.It still needed something, so I added dots of Star Dust stickles to some of the flourishes.
I added the Ice stickles in coffee to all of the corners and middles of the layers in a series of three dots in each spot. I decided I had added enough stickles, because stickles can move a project from gorgeous to tacky if you over do it.
When it dried, there was still something not right. The printed cardstock had some yellow or orange undertones, so I grabbed my Wild Honey distress ink pad and added just a little honey to a few spots and it looked like a complete different project. That last little touch kicked it up the notch it needed.
I love the way it turned out. I had upcycled, distressed, and created something pretty for my home. Now came the hard part...what to do with it. Do I add a hanger to the back and hang it on the wall?
Do I add it to a wreath? And hang that? Do I set it on an easel? Do I add a "kickstand" to the back to make it free standing? A a pretty ribbon and hang it from that?
What do you think readers? How would you like to see it finished? I will be reading your comments and will let you know what I decide. In the mean time, head over to
Hobby Baby and see what they have to offer. You can also check out their
BLOG.
Happy Crafting and hope to see you back soon!
KathyJo


1 comments:
great post...
Post a Comment